Two Different Buttons More
Pins are popular these days, so I thought why not write a tutorial on how to create these in Adobe Illustrator. If you’ve ever wondered how to simulate this realistic looking pin or button effect, here’s your chance to learn. Draw the pin shape
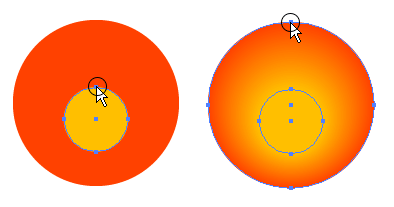
Draw a circle by choosing the Ellipse tool and holding down the shift key while dragging the mouse. Fill with a gradient
To the left of the circle is my Geeky Dog that I want to use for the pin, but just for demonstration purpose we'll create an actual pin first and then at the end we'll wrap it with this illustration. Add a radial gradient fill to the circle. I've used orange yellow in my example here. Now change the position of the radial gradient by selecting the Gradient tool in the Toolbox and click-drag while holding down the shift key from the center bottom of the circle towards somewhere above the center point of the circle. Draw the shiny highlight shape
Create a new layer by clicking the Add New Layer icon at the bottom of the Layers palette. Double click the new layer and give it the name 'shiny highlight'. Press 'd' on the keyboard to set white as fill color and black as stroke color. Set the stroke to no fill by clicking on the Stroke icon in the Toolbox or Color palette and selecting the 'None' fill option at the bottom of the Toolbox or Color palette (the white square with the red diagonal line). Select the Ellipse tool again and draw a circle (holding down the shift key) that is slightly smaller then the pin's circle. The circle should have a white fill now and no border. Deselect the circle and draw a wider ellipse (with a white fill) on top of this white circle a bit as shown in the image above. Select both the pin's circle and the white ellipse and circle. Click the vertical center alignment in the Option bar (or Align palette) to align everything nicely.
Deselect the pin's circle. Use the (black arrow) selection tool and click the gradient/pin's circle holding down the shift key. Now only the white ellipse and circle are selected. Click the Subtract from Shape area in the Pathfinder palette and click the Expand button. Add the shiny highlight effect
Select the Rectangle shape tool in the Toolbox and draw a rectangle on top of the highlight shape. Make sure the rectangle covers the entire highlight shape. Fill the rectangle with the default white to black linear gradient enter -90° as angle value or use the Gradient tool again like you did for the radial gradient for the pin's background. Only now you need to move downwards with the mouse holding down the shift key. Now select both the gradient rectangle and the white highlight shape. Now selecting the highlight shape might be a bit tricky. You can make it yourself very easy by using the Layers palette's "Click to target's" option. I'm referring to the small circle buttons you see on the right of each layer. Click on the arrow to the left of the layer thumbnail of the 'shiny highlight' Layer to reveal all sub-layers. Now click the sub-layer that holds the white highlight shape, hold down the shift key and click the sub-layer that holds the gradient rectangle.
This gradient rectangle will be used as masking effect for our highlight. Now that we have both shapes selected, all we need to do is go to the Transparency palette and choose 'Make Opacity Mask' in the palette's dropdown menu. Add the image on the pin
Select the gradient circle and copy the shape. Now select the image you want to put on the pin. Make sure the image is one group (command/control + g). To make it easy on yourself, make sure this image is in a separate layer on top of the gradient circle. Drag the image on top of the pin now. Make sure the pin is nicely covered and things are nicely centered etc. Now hit command/control + f (to paste the gradient circle on right on top). Give this circle no fill. Now click the target circle icon again in its layer to select the entire layer. Hit command/control + 7. This way the circle is used as a mask for the image. Hey, it looks like you have almost a pin now :) Almost yes, exactly, because we're not there yet. We need to make it perfect. Add more depth to make it perfect
I think it could use a bit more depth. Create a new layer on top of the image but below the shiny highlight layer. Double click it and call it 'depth effect'. Paste the circle in front again by pressing command/control + f. Change the colors of the gradient fill to white and black as shown in the image and drag the gradient slider all the way to the right.
Change the Layer mode to Multiply to make the white transparent. Change the transparency to 20% or higher if you believe higher is better. This depends a bit on the color of the image. 'Et voilà', you have your pin :) Gravatastic desktop illustration
Here are my Illustrator pins placed as Smart Objects in Photoshop. You can download this as a desktop if you like. For those who wonder how to create this pin in Photoshop, sit tight I'll tell you this in my next tutorial. Meanwhile I hope you all enjoyed this tutorial and have learned something fun and useful. Want to learn more?
posted in: Photoshop-Illustrator | Tutorials | relatedAnother learning resourceLayers Magazine, for everything you need to know about the Adobe® CS4 apps.
1. Create the Circle ShapesFirst create a circle path and fill it with orange color. Then Copy (Ctrl+C) it and Paste in Front (Ctrl+F). Scale down about 40% and drag it slight below the center point of the orange circle.
2. Blend ToolSelect the Blend Tool, click on the top edge of the yellow circle and then click again on the top edge of the orange circle. Or you can blend them by selecting both circles, go to Object > Blend > Make (Ctrl+Alt+B). Remember to have no outline selected.
3. Add Final Light ReflectionMake an oval path and fill it with black & white Gradient and place it on top of the circles. We are using CMYK, so make sure the black for the gradient is full black(C=100, M=100, Y=100, K=100). Ask Mr. Cavada for help here!!! Next with the oval path selected, go to Transparency pallate, select Screen Blend Mode. If your Transparency is not showing, go to Window > Transparency or press Ctrl+Shift+F10.
AdvantagesThere are serveral advantages to create this glossy button with Illustrator than Photoshop:
Now add you vector logo |